

Here I want to show you the different tools that will help you get started with your YouTube channel. They will make your life as a vlogger easier.
They will also save you money and a lot of recording time. Here I include all the best vlogging equipment that is essential and also a bit more that can let you achieve unique videos.
Table of Contents
A Good Microphone
The most important tool for vlogs you will ever need is a good microphone. It is really important that your viewers can hear you well. If they can’t, they will just stop your video and will go away without subscribing to your channel.
However, I must admit that lately, built-in audio is getting better for both smartphones and cameras. So it may be not necessary for you to get a good mic. If you are going to go out a lot with your camera, adding a microphone to your list of equipment can make it more difficult.
That’s why I suggest you record some vlogs as a way to test your device’s audio. If you can hear yourself just fine, you can ignore this.
Even if you don’t get a microphone, if you go out a lot, you probably will want to get at least a windshield for your mic. Wind can make it impossible to record audio, but this small, cheap, and lightweight piece of equipment will neutralize most of the noise.
If you decide you need a mic, here are some suggestions:
- USB microphone for recording from home: They offer good quality for the price, and they are good at suppressing the background noise pretty well. For going out, get one of the following.
- A lavaliere microphone to connect to your camera’s microphone input and you need to clip well to your clothes or hold with one hand close to your mouth.
- An external recorder like the popular Zoom H1, and a lavaliere microphone to connect to it (if your camera doesn’t have mic jack).
- A shotgun microphone if you have a DSLR or a camera with a hot shoe.
One of the most popular microphones between YouTubers is the Blue Yeti. In general, mics from Blue are a common choice between YouTubers, but there are other great brands out there for USB and non-USB microphones.
If you’re wondering what kind of mic you should get, you should check my buyer’s guide here: The 10 Absolutely Best Vlogging Microphones for YouTube.
Lighting for Indoors
If you’re going to record a lot from indoors and you want it to look good, you will need to control your lighting.
Most cameras can record high-quality video as long as there’s good lighting. Investing some money in lighting equipment will actually improve your camera’s recording quality. You can even get away with a really cheap camera if you just have a good lighting setup.

Using good lighting will make you look healthier and it gives your video a professional look. Make sure not to forget about it if you are recording from home.
And the best thing is that you can build your own lighting on a budget.
You can first try to control the light sources —either artificial or natural— that you already have at home. You can achieve good lighting for free if you’re lucky enough to have a good amount of windows in your room. You can combine them with any lamp you have lying around that can display a bright light.
When it comes to lighting, there are a couple of options I like for recording videos from home:
- Ring Light: These are some of the most popular choices for YouTubers. This kind of lighting removes shadows from your subject’s face. It will make your face really bright and give your eyes a shining, halo effect. Some people love this, some others don’t.
- Video LED Light: These can be more expensive and occupy more space, but they are also more versatile and they will make you look different to most YouTube channels out there. It doesn’t get rid completely of shadows like it happens with ring lights and instead makes it look more like natural light. These are my favorite.
If you want some specific recommendations, read my guide on YouTube lighting.
Tripod, Selfie Stick, or Gimbal

Camera holders— like tripods—are the photographer’s best friends. For vloggers, they allow us to record ourselves without the need for a camera operator. I still don’t know any vlogger who doesn’t use one.
You want a tripod or holder that is small and lightweight, as you’ll be carrying it around for a long time.
Tripods
There are 3 very popular models. To find out more about them, read my tripod guide. All of them have their own unique advantages:


Gimbals
Gimbals are more expensive but they give you great image stabilization for going out with your camera. However, they can be heavier than some tripods—except the heavy ones, like Jobys.

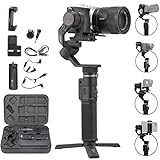


If you want to read more about them, check out my gimbals guide.
As for selfie sticks, it doesn’t matter too much which one you choose. They’re all similar and they’re not my first choice even for phones because they tend to be a bit too unstable for my taste. But if you already have one, use it instead of spending money on one.
Backpack

An extremely important piece of equipment most people don’t think about when starting their vlogging activities is a proper backpack.
Vlogging equipment is too fragile—and expensive—for you to think lightly about this.
You can, of course, use any backpack you have at home, but there are specialized backpacks that come with compartments you can adapt to your equipment so it doesn’t move around and clash with each other.
This can help prevent any scratches or damage to your camera and lenses, which are the most expensive equipment you will carry with you.


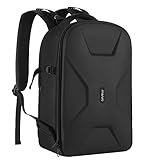

We’ve made a nice top list of the best backpacks for this so you can read more about them.
Editing Software
Something all vloggers need is an editing software. Funny enough, most of you don’t realize it until you finish recording your first video and have to find a way of putting everything together. Here I will show you both free and premium editors you can use for your work.
Free Editors
If you only need to cut, paste clips and insert some basic text, you can go with a free software, although something premium will give you more advantages later on.
- For Windows: DaVinci Resolve
- For MAC: IMovie (it comes installed in your MAC OS)
There are many more options out there, but these two are the most popular
Premium Editors
The following editors are used by professional editors for all kinds of work. They are also popular for YouTube due to the competitive advantage of having good editing for your videos. You won’t see a top vlogger with bad editing —although most of them hire a full-time editor.
These apps offer thousands of options and functions, and they are more efficient when encoding video than most free apps.

Adobe Premiere Pro: This app is extremely popular on YouTube. It’s available at a subscription of $20,99 per month if you pay the year at once. However, it has all that you can possibly need to edit a vlog.

Final Cut Pro: This one is the alternative for MAC users. It is also professional-level software, but this one is available for a one-time payment of $299.99
These are not the only editors, there are cheaper and free options too.
Quality of Life YouTube Tools

I’m talking about tools like TubeBuddy and VidIQ. These are free browser extensions (with some premium features) that you install on your browser and gives you a bunch of new unique features once you visit YouTube.
Either of these two tools will make your life as a YouTuber so much easier. They will help you in so many ways:
- Finding new content ideas
- Knowing what’s trending
- Auto-inserting video descriptions
- Post video screen templates
- Much, much more.
Even their free version is worth installing. It’s better to choose one of the two because they don’t work too well together since some of their features can overlap.
If you’re not sure which one to use, check out our Tubebuddy vs Vidiq comparison.
Here’s a Wild Idea… What About a Drone?
Let’s face the truth:
This is a premium tool. Not at all needed for vlogs. A big boy’s tool if you may. But darn it, they are fun and can achieve unique shots.
But in all seriousness, they aren’t toys; they will allow you to record some unique, entertaining, creative, and attractive content.
There are many drones in the market, but the most popular ones for video are the DJI Phantom. There are many models of this drone at different price ranges, so I will guide you through their differences here.
The price difference between these drones are related to how much of them you can control (including the camera’s manual mode), the recording quality of their camera, how far they can fly, GPS quality how well they stay in position, and how easy they can land.
You will basically need to choose one according to your budget, as for these drones their quality is very much attached to their price (although some of these only offer 4k recording for the extra price).
What About The Camera?
Getting a camera just for vlogging might not be something you need to do. First, I recommend you start with your phone. If you have a high-end smartphone, most of them are just as good as any vlogging camera.
However, if you need a better camera than what your phone offers, you can visit any of the posts that I’ve written here, according to what you want:
- If you have the money to invest, you can visit our updated list of the best vlogging cameras.
- Instead, if you’re on a budget you can get a cheaper camera that is just good enough for vlogging.
I also made a guide on what lens to buy if you get an interchangeable lens camera.
Also, another alternative is getting a video starter kit bundle. These are bundles that include everything you need to start with video creation: microphone, camera, tripod, batteries, memory cards, and even more.
Will has been a full-time content creator since 2014. He’s an audio, video, and tech hobbyist dedicated to reviewing products and giving you the best tips he knows to grow your audience.