

As a content creator with more than 8 years of doing this full-time, I’ve come to own a lot of microphones.
I can tell you this after these years: the single most important piece of equipment you need to grow an audience is a good microphone. The camera comes in second place. After all, nobody will follow you if they can’t hear you well, so it’s an important step to becoming a successful vlogger.
I’ve now compiled a list of the best mics you can own. I included each of the types of microphones you might be interested in according to your needs. I’ve separated them according to their utility and nature. You can use the Table of Contents to navigate through the different sections.
If you find that your audio is not good even after using a good microphone, check out our guide to fix audio issues.
Table of Contents
- Our Most Favorite Mics for YouTube
- What Type of Mic Do You Need for YouTube?
- The 4 Best USB Microphones for YouTube
- The 2 Best Recorder for Cameras Without Mic Jack
- The 2 Best Microphone to Connect to Your Smartphone
- The 2 Best Lavalier Microphone to Connect to Your Camera
- The 4 Best Shotgun Microphones for Cameras with Hot Shoe (DSLR, Point & Shoot or Mirrorless)
Our Most Favorite Mics for YouTube
These are our very top choices, but you’ll find more alternatives in this post.


What Type of Mic Do You Need for YouTube?

You want to get a unidirectional or bidirectional microphone if you don’t want to record everything that is happening outside your window. Nobody wants to hear the sound of a truck passing by your house, or the neighborhood kids cleverly insulting each other, right?
The most common type of unidirectional microphone is the cardioid. These are microphones made for speech, and they will only record sound coming from one direction. These are the best you will find for vlogging.
Finally, there are mainly 3 kinds of microphones you will find when looking for the best microphone for vlogging:

Condenser and Dynamic Microphones: These are microphones that convert acoustic sounds into electrical signals. Condenser is used to record music, but they are also popular for speech recording. They are made for studio music recording because they tend to capture delicate sounds, which might result in background noise. Dynamic microphones are better for voice recording of live events because they cut out the background noise since they capture the stronger sounds. The latter is ideal if you are recording in a really noisy environment.
There are 2 kinds of condenser mics that are interesting for vlogging:

Lavalier Microphones: These are really small microphones that you can clip to your clothing. They are useful when you don’t want to face a static microphone when speaking. These microphones are omnidirectional, but the noise is easy to suppress since they’re attached close to your mouth. You can hide them in your clothing, but you won’t be able to move around because the microphone will capture the sound of your clothing rubbing against it. The best way to use them is by clipping them to the external part of your clothing, like this:

Shotgun Microphones: These are the most common microphones that can be connected to your DSLR. They have a really narrow area to capture sound in the front, and they cancel sound waves that come from other directions. They don’t amplify sound, like most people think. They just have a very narrow sensitive area to capture the sound waves that approach their front end. They are really good for recording from a long distance.
Now, let’s start with the lists. I’ve put a lot of effort in getting rid of microphones you won’t need for vlogging, and also those that are not worth the price.
We’ll start with USB microphones. These ones are very popular mics for YouTube vlogging, and for good reasons.
The 4 Best USB Microphones for YouTube

Most YouTubers will want to get a really cheap webcam that can record top quality video —see my post The 6 Best Webcams for Youtube Vlogging— and combine it with a good USB microphone. This is a good idea since webcams are so cheap and the most important thing you should worry about is sound.
These are also the best microphones for YouTube gaming, as you can record directly to your PC and sync video and audio easily.
In general, USB microphones are great for anyone that’s looking to record videos in front of their PC.
There are some really good and popular options for USB mics to connect to your PC, or even DSLR:
Blue Snowball
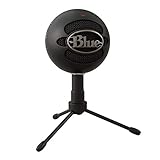
There is no reason to go for a cheaper microphone than the Blue Snowball. Even if you don’t have the money right now, you should wait for a sale or save money until you can buy it. This is the best-priced microphone you can get to record sound to your PC.
Most people even prefer to save more money and get a higher-quality Blue Yeti microphone. Nevertheless, you can’t go wrong with a Snowball; that’s why it’s still popular between streamers and vloggers.
With this microphone, you will be able to switch between 2 modes: Omnidirectional and cardioid.
One last thing to say about it is that it comes in different colors. This is cool if you want to show it on your videos or simply for personal taste.
One alternative to this microphone is the Samson Meteor Mic USB Studio Microphone. The main difference is that the Snowball has better audio quality, but the Meteor includes a headphones jack, mute switch and volume controls. Also, it’s smaller, which some people find useful.
The best budget USB microphone alternative to the Snowball is the Samson Go Mic. You can still choose between cardioid and omnidirectional with it, but its recording quality is lower. Consider that its price is not that different from the Snowball’s.
Still, although I would save for the Snowball, I do admit that the quality of the Samson is fair for the price.
Blue Yeti

This is the best-seller USB condenser microphone on Amazon. It is also pretty common among YouTubers. It offers a wide variety of sound-capturing pattern modes and its sound quality is pretty good for the price.
You can choose between cardioid, bidirectional, omnidirectional, and stereo. The stereo mode is close to the omnidirectional, but it’s more selective. It just allows the sound from the right and left to give the surrounding effect. Nevertheless, you will most likely use the cardioid mode for vlogging.
Finally, this one includes the useful buttons the Snowball is missing for mute and volume control. It also includes headphones output.
Whether you should get something better than a Blue Yeti or not, it will depend on how much money you have available. You can start with this one and it’s going to be good enough for a long time. You can upgrade to a higher-quality microphone that is even better at sound suppression, but it’s not needed from the beginning.
Microphones get to a point where the more you pay, the better sound quality you get. You won’t sacrifice important features whether you get one or another like it often happens with cameras.
You will get better sound quality as you spend more. That’s it.
Audio-Technica AT2020
This is the one I personally use because I didn’t need the switchable patterns offered by Blue. I only cared about having a cardioid mic that is decent at suppressing background noise because my room is a bit of an echo chamber.
The reason for its price is that this one only offers the cardioid mode, but it’s the perfect sensibility pattern if you’re recording from home. You won’t need a bidirectional mic unless you need two speakers at the same time, and omnidirectional is usually a bad idea if you don’t want to hear background noise.

Another reason is that it does not include any mute switch. This is just the trade you get: better audio for fewer features that aren’t completely necessary.
It is the best you can get at this price range. Semi-professional microphones start around the $300 mark, and this one is better than some of them.
Getting something more expensive than an Audio-Technica AT2020 is only good if you really want to get rid of all background noise.
The sound quality of this condenser microphone is good for both vlogging and podcasting, but it won’t get rid of the background noise by itself.
If you want to stop worrying about background noise and you don’t have the money or capacity to build a home studio, the Shure SM7B will be your holy grail.
Shure SM7B

Well, this isn’t exactly a USB mic.
You will need an XLR cable and a preamp that you can connect through USB, but I NEED to mention this microphone.
This Shure mic is the mic you can buy to suppress all background noise.
It’s extremely popular between top podcasts, voice-over actors, and even some YouTubers and Twitch streamers.
As a dynamic mic, it will only capture what it’s coming from the front with its unidirectional pattern.
Since the microphone records at a really low DB level to avoid capturing background noise, you will also need a preamp to increase the signal to usable levels.
But that’s why it’s so popular. Simply because it will completely ignore any noise you have in your room. You will sound like you’re inside a professional sound-treated room.
The bad news is that it is more expensive than the rest and it requires additional equipment (the preamps and XLR cables).
But believe me, this microphone is worth it.
For more information about everything you need for it to work properly, read my Shure SM7B review.
Extra Accessories for Your USB Mic
Boom arm and shock mount

You can technically use a small tripod to hold your USB mic. However, I prefer boom arms because they free up a lot of space on my desk.
You’ll have to be careful if you hit your desk, as the sound waves will travel through the entire arm and to the mic. So you will hear it very clearly.
This can get annoying and the only way to deal with it is with a shock mount. Here’s the one I use for my Audio Technica AT2020.
There are many boom arms and shock mounts in the market. Some are more effective than others. You’ll need to find one that is compatible with your mic on Amazon, and that is inside your budget — don’t worry, there are plenty of options.
Pop Filter
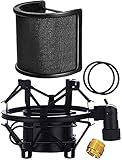
This is another accessory you’ll want to get, especially if you got a condenser mic.
Some people think that they help with the hissing sounds we make when pronouncing letters like S.
But they’re only helpful to reduce the popping sound that is so common when speaking close to the mic.
This noise is caused by releasing fast-moving air directly to the mic when pronouncing letters like P and B.
To reduce the hissing sounds, you can only do it by being more careful when pronouncing them or by using a de-essing filter in your editor.
Anyway, I highly recommend getting a pop filter because they’re extremely cheap, but they fix a big problem.
I remember recording without one and I just couldn’t stand the constant popping sounds.
The 2 Best Recorder for Cameras Without Mic Jack
Zoom H1

One of the most annoying things you will find when looking for a new camera is that most of those that are good for vlogging —check my post on the 6 best vlogging cameras with flip screen— don’t come with a mic jack.
This is especially true with compact and mirrorless cameras. But there is a simple way to fix this problem: buying an external recorder that you can use to connect a good mic to it.
The most common choice is the Zoom H1. This microphone/recorder is made of two unidirectional mics that are facing each other at 90 degrees. This allows you to get good stereo sound. It is much better than simply choosing an omnidirectional microphone.
It is a great choice when you need to take your microphone somewhere. It’s comfortable to carry around.
It also excels at recording music bands thanks to its 2 unidirectional microphones. You can position the musicians adequately to use it as a stereo recording system.
Still, this recorder will not get rid of the ambient sound. Even though its sound capturing system is unidirectional, its microphones are facing opposite directions. This means that it will capture sound from various directions, so by itself it’s not the best one to isolate sound.
That’s why I still think it’s better to get a lavaliere microphone to connect to it rather than using this as a voice recorder alone. And if you’re walking around with your camera, that’s the only way to record good audio, actually.
For me, the perfect combination is getting a Giant Squid lavalier microphone (reviewed below) to connect to the Zoom H1.
This is a good solution if your camera didn’t come with an external microphone port. The Giant Squid might be the best lavalier microphone for YouTube vlogging out there.
This is the easiest way to vlog while walking with your camera. Put the H1 in your pocket and connect the Giant Squid to it.
Zoom H4N Pro

A more expensive option, but also with a lot more advantages is the H4N.
For starters, it’s a lot more resistant, although it’s also twice as big. It also allows you to rotate the microphone capsules, so they’re not fixed at 90 degrees.
It can also record 4 tracks simultaneously.
But the biggest change is that it has 2 XLR/TRS inputs, which are required by most studio microphones and instruments. However, the microphones I recommend here don’t need this kind of input, so it’s only something you’ll need if you want to get more serious about sound.
Most vloggers will find the H1 good enough, but if you want to push things to the maximum, you’ll want to get the H4n Pro.
The 2 Best Microphone to Connect to Your Smartphone
| Preview | Product | Price | |
|---|---|---|---|
|
Rode SmartLav+ Lavalier Microphone for Smartphones,Black | Check on Amazon |
PowerDeWise Professional Grade Lavalier
This one is in my opinion, the best cheap microphone for your smartphone.
I really doubt you can find anything better for that low price. It’s really risky to go for any cheap, but I’m happy with this one. And that’s something I can’t say often.
If you already have a phone with a good camera, it’s okay to start vlogging with it. This one is the solution for your sound; it will improve it a lot. It is one of the few cheap microphones for YouTube that I don’t think will disappoint you.
Connecting a microphone to your smartphone is also an alternative to the Zoom H1, although this option is not as good (it’s a LOT cheaper after all).
There are other similar options that are much more expensive than this one, but I don’t think they’re worth the price; they’re still omnidirectional and don’t present any significant sound improvement.
If you’re willing to spend more money, you can get a Giant Squid with an adaptor. You will get much better sound quality.
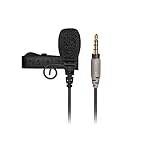
Rode smartLav+ Lavalier Microphone
Another good option is the Rode smartLav+ Lavalier Microphone. This one is more expensive but it does come with better sound quality and sound suppression. Bear in mind that for IOS, you will need to pay an extra $5.99 for the app that allows you to use this microphone.
The 2 Best Lavalier Microphone to Connect to Your Camera
| Preview | Product | Price | |
|---|---|---|---|

|
Giant Squid Omnidirectional Mono Microphone | Check on Amazon |
If you bought a compact camera, you will most likely need to buy a lavalier microphone.
Remember that lavaliers are omnidirectional, so they will catch ambient sound. However, it’s easier to suppress the noise through editing because your voice will be noticeable higher (since you clip them on your shirt, close to your mouth).
Before starting, I just want to tell you that if you have the money for a Giant Squid just go for it. It’s not even worth for you to keep reading this part. It is hands down my favorite lavalier microphone. Its quality is comparable to many professional microphones, just be aware that the cable is a bit short.
If you prefer going for a cheaper mic, then the following one will do good for the price:
The Vidpro Lavalier Condenser Microphone is another good, cheap microphone for YouTube that will improve the sound you can get with your camera.
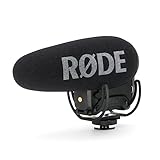
The 4 Best Shotgun Microphones for Cameras with Hot Shoe (DSLR, Point & Shoot or Mirrorless)


Hot shoes are found in almost every DSLR and some compact cameras. The following microphones are attachable to a camera’s hot shoe.
There’s a good reason why I don’t recommend extremely cheap shotgun microphones.
The cheap ones don’t deserve the shotgun name; they’re bad at suppressing ambient sound. They are a lot noisier than they should. You’d rather keep using your camera’s built-in mic instead of getting a cheap shotgun mic.
I know three shotgun microphones that are worth your money
Now, are these mics much different from each other?
They’re different in terms of quality. You just need to know how much money you’re willing to spend and how much noise you need to reduce. The prices of the following microphones are relative to the clear audio you achieve, so you don’t need to worry about them not meeting your expectations. Getting a more expensive shotgun microphone will just mean more noise reduction and better recording quality.
This is why I won’t say much about them. I’m just going to show you microphones that are good for their price range.
Gladly, there is one good option if you are on a tight budget. The rest scale up in cost as they scale up in quality.
Will has been a full-time content creator since 2014. He’s an audio, video, and tech hobbyist dedicated to reviewing products and giving you the best tips he knows to grow your audience.